Riverside University Health System
Splinting + Casting
General Principles
-
Goals: Immobilization, protection, and decreasing pain.
-
Inspect (and clean skin to make sure there is no open fracture.
-
Before casting or splinting material is applied, prepare the skin with padding such as stockinette and webril.
-
Allow enough overhang of the stockinette and webril to roll back over the first layer of casting or splinting material to ensure that the casting or splinting material does not come in direct contact with the skin leading to irritation and maceration.
-
This also allows for a more aesthetically appealing final product.
-
-
Stockinette: Add extra on both ends. Remove wrinkles at ankle, elbow.
-
Webril: Overlap approximately one third to one half of diameter. Add extra padding over bony prominences (radial and ulnar styloids, epicondyles, malleoli). Keep padding as smooth as possible since gathered ridges may produce pressure areas and increase risk of skin breakdown.
-
Cast material: (Plaster of Paris or fiberglass) Use cool water - the warmer the water, the fast the material dries.
-
Ace Bandage: Wrap the "finished product" in elastic wrap.
Plaster
Plaster of Paris:
-
Cheaper and easier to mold than fiberglass.
-
Requires special "plaster trap" in the pumping of the sink
-
More difficult to "see through" on x-ray than fiberglass
-
Width of plaster depends on size of patient and location of injury
-
Unroll dry plaster to meausre needed length. Allow extra 1-2 cm to accommodate for shrinkage when wet.
-
Use 4-8 layers, depending on location/type of cast or splint.
-
Submerge in cool water (plaster is saturated when no bubbles rise to surface).
-
Smooth plaster to get rid of excess water. Excessive wringing is not necessary.
-
Wrap (place) plaster over previously placed padding. Do no wrap under tension. Smooth with palms of hands. Avoid using fingers which can create pressure points and indentations in the drying plaster.
-
Apply ace-wrap. Do not use tension.
-
Plaster will set in 3-5 minutes and will dry in 24 hours.
-
Avoid exposure to water. If cast/splint gets wet, may use hair dryer.
-
Counsel patient regarding skin maceration, infection, neurovascular compromise. Instruct patient to seek follow-up if these arise.
Fiberglass
Fiberglass:
-
Knitted fiberglass impregnated with polymer resin and silicone.
-
Lighter and more durable than plaster, but not as moldable.
-
Use gloves to prevent resin from adhering to skin.
-
Sets within 4-5 minutes, dries completely in one hour.
-
Minimally interferes with radiography.
-
Avoid opening the foil package until ready to place the splint or cast.
-
On either end, leave a margin of ~1 cm between webril and start of fiberglass.
-
counsel patient regarding skin maceration, injection, neurovascular compromise. Instruct patient to seek follow-up if these arise.
Orthopedic Splinting Basics
If you have access to EM RAP:
Types of Splints
Long Arm Posterior Splint
Indications:
-
Elbow and Forearm Injuries:
-
Distal humerus fx
-
Both-bone forearm fx
-
Unstable proximal radius or ulna fx (sugar- tong better)
-
-
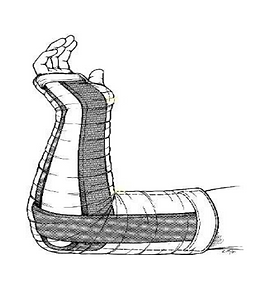
Doesn't completely eliminate supination/pronation -either add an anterior splint or use a double sugar- tong if complex or unstable distal forearm fx


Forearm Sugar Tong
Indications:
-
Distal radius and ulnar fx
-
Prevents pronation/supination and immobilizes elbow
-


Double Sugar Tong (Sugar Tong w/ Coaptation Splint)
Indications:
-
Elbow and Forearm Injuries:
-
Elbow and Forearm fx - prox/mid/distal radius and ulnar fx
-
-
Better for most distal forearm and elbow fx because limits flex/extension and pronation/supination.


Forearm Volar Splint (aka 'Cockup' Splint)
Indications:
-
Soft tissue hand/wrist injuries
-
i.e sprain, carpal tunnel night splints, etc.
-
-
Most wrist fx, 2nd- 5th metacarpal fx
-
May add a dorsal splint for increased stability
-
i.e 'sandwich splint' (b)
-
-
Not used for distal radius or ulnar fx
-
can still supinate and pronate
-


Finger Splints
-
Sprains
-
dynamic splinting (budding taping)
-
-
Dorsal Volar finger splints
-
phalangeal fx, though gutter splints probably better for proximal fxs
-


Hand Splinting
-
The correct position for most hand splints is the position of function, a.k.a the neutral position
-
When immobilizing metacarpal neck fractures, the MCP joint should be flexed to 90 degrees


Radial Gutter
Indications:
-
Phalangeal and metacarpal fractures and soft tissue injuries of index and long fingers
-
Have the patient hold an ace wrap in the "beer can" position until the splint hardens: wrist slightly extended (10 - 25deg) with fingers flexed as shown.


Ulnar Gutter
Indications:
-
Phalangeal and metacarpal fractures and soft tissue injuries of the little and ring fingers


Thumb Spica
Indications:
-
Scaphoid fx - (check snuffbox tenderness)
-
De Quervain Tenosynovitis
-
Notching the plaster (shown) prevents buckling when wrapping around thumb
-
For thumb fx, immobilize the thumb as if holding a wine glass


Stirrup Splint
Indications:
-
Similar to posterior splint
-
Less inversion/eversion and actually less plantar flexation compared to posterior splint
-
Great for ankle sprains
-
12-15 layers of 4-6 plaster


Posterior Ankle Splint
Indications:
-
Distal tibia/fibula fx
-
Reduced dislocations
-
Severe sprains
-
Tarsal/metatarsal fx
-
Use at least 12-15 layers of plaster
-
Adding a coaptation splint (stirrup) to the posterior splint eliminates inversion/eversion - especially useful for unstable fx and sprains.


